ARIZER HINTS & TIPS: BUBBLER BASICS WITH
THE FROSTED GLASS AROMA TUBES
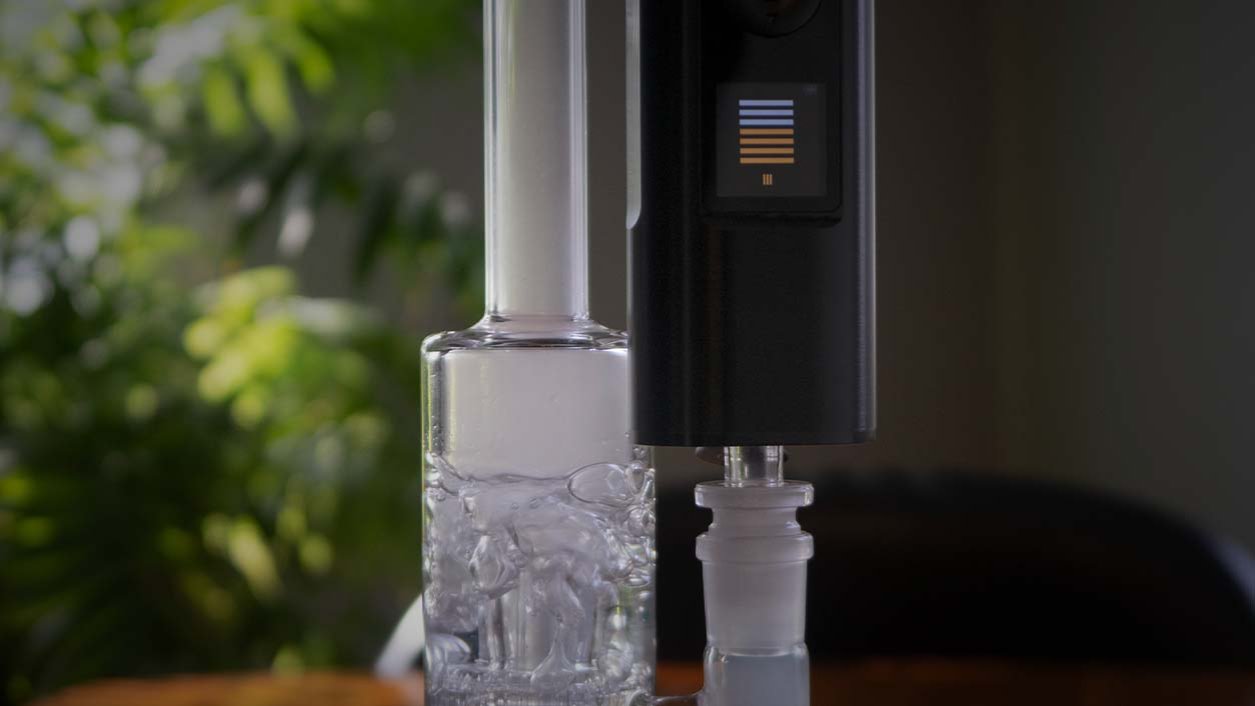
Get fast and efficient water filtration when using your Arizer dry herb vaporizer with a third party water bubbler. We have all the glass and gear to get you hooked up, so read on to find out how to get ripping today with massive clouds of tasty vapor.
Portable Vaporizer Set Up
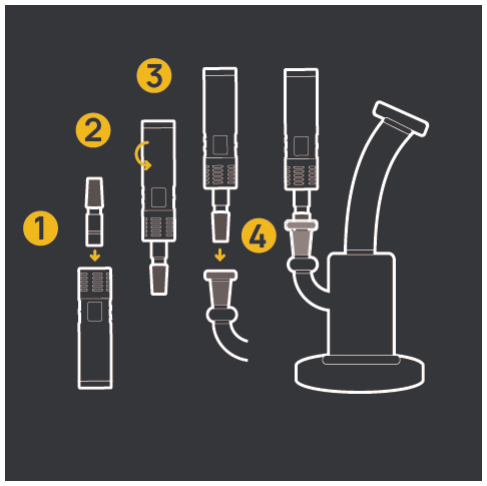
Included parts that you will need for Air MAX, Solo II MAX & Solo III:
14mm Frosted Aroma Tube
Extra parts needed to be Purchased for Air SE, Solo II & Argo:
14mm Frosted Aroma Tube or ArGo 14mm Frosted Aroma Tube
How To Set It Up
- Load Frosted Glass Aroma Tube (The Right Way to Pack A Glass Aroma Tube)
- Insert in Arizer Portable dry herb Vaporizer, turn it on, set temperature and let the unit heat up
- Flip upside down and insert into the ground joint of the Bubbler
- some models have screen and control inversion designed specifically for working upside down
- Adaptors are available to fit any rig
- Draw cool and tasty vapor through the bubbler
NOTE: use higher temperatures for some seriously thick clouds
Desktop Vaporizer Set Ups
“What’s Included” Version
Included parts that you will need for XQ2, Extreme Q & V-Tower:
- Cyclone Bowl or Connoisseur Bowl with Tuff BowlGrip (depending on Model)
- Miniwhip
- Glass Balloon Mouthpiece
- PVC Hose/Tubing
- Glass Elbow
Extra parts needed to be Purchased for V-Tower:
- Miniwhip
- Glass Balloon Mouthpiece
How To Set It Up
- Load your original Cyclone or Connoisseur Bowl (See “The Right Way to Use A Glass Cyclone & Connoisseur Bowl”)
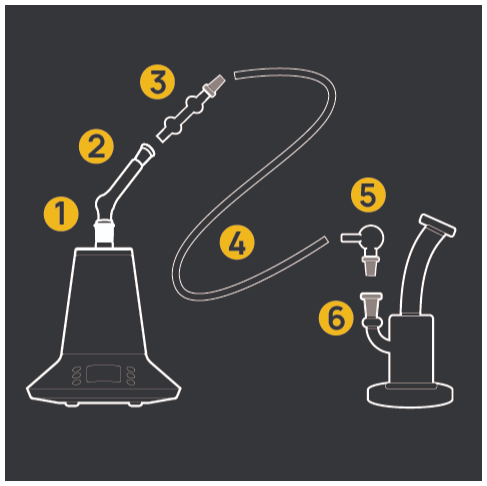
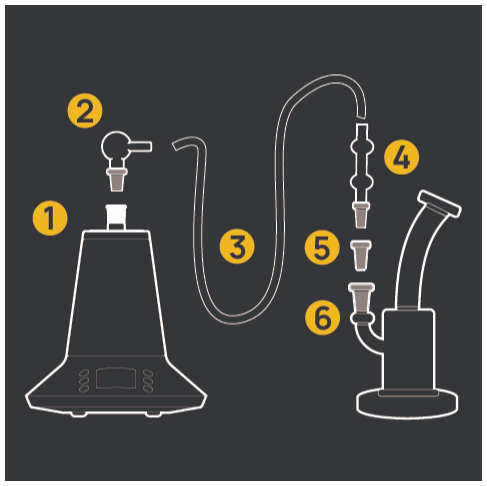
- Attach the Bowl (1) to the Desktop Vaporizer, turn it on, set the temperature and let the unit heat up
- Attach the miniwhip (2) to the Bowl (1) Take the Tube (4)>, and on one end insert the Glass Balloon Mouthpiece (3), and on the other end insert the Glass Elbow (5). Now Connect the Bubbler by inserting the Glass Balloon Mouthpiece (3) into the miniwhip, and the Glass Elbow into the Ground Joint of the Bubbler (6). Adaptors are available to fit any rig
- Draw cool and tasty vapor through the bubbler
“One Step Up” Version
Included parts that you will need for XQ2 & Extreme Q:
- Cyclone Bowl or Connoisseur Bowl with Tuff BowlGrip
- Glass Balloon Mouthpiece
- PVC Hose/Tubing
- Glass Elbow
Part needed to be Purchased:
- Frosted Glass Reducer (14-11) or (19-11)
Extra Parts needed to be Purchased for V-Tower:
- Glass Balloon Mouthpiece
How To Set It Up
- Load your original Cyclone Bowl or Connoisseur Bowl (See “The Right Way to Use A Glass Cyclone & Connoisseur Bowl”)
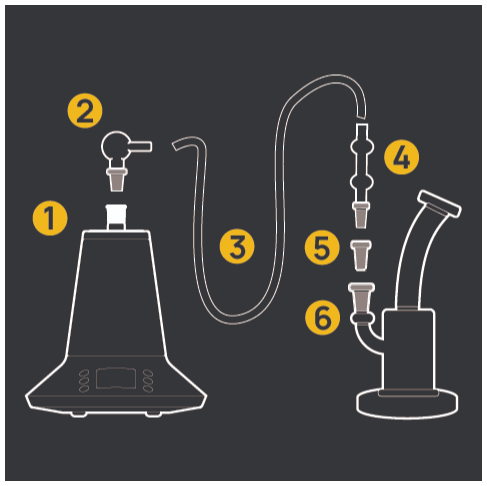
- Attach the Bowl (1) to the Desktop Vaporizer, turn it on, set the temperature and let the unit heat up
- Take the Tube (3), and on one end insert the Glass Balloon Mouthpiece (4), and on the other end insert a Glass Elbow (2).
- Now connect the Bubbler by inserting the Glass Elbow (2) into the Bowl (1), and the Glass Balloon Mouthpiece (4) into the Ground Joint of the Bubbler (6), using a Frosted Glass Reducer (5).
- Draw cool and tasty vapor through the bubbler
“Arizer Pro” Version
Included parts that you will need for XQ2, Extreme Q & V-Tower:
- Cyclone Bowl or Connoisseur Bowl with Tuff BowlGrip
- Glass Elbow
- Hose/Tubing
- Part needed to be Purchased for XQ2, Extreme Q & V-Tower:
- Additional Glass Elbow
- Part needed to be Purchased for XQ2, Extreme Q & V-Tower:
- Parts needed to be Purchased for Pro Version:
- Connoisseur Bowl & Tuff BowlGrips Pack (Extreme Q & V-Tower)
- Glass Elbow Adapter w./ Glass Screen x 2
- Hose / Tubing (9 Feet) – Silicone Option
How To Set It Up
- Load your Connoisseur Bowl (See “The Right Way to Use A Glass Cyclone & Connoisseur Bowl”)
- Attach the Bowl (1) to the Desktop Vaporizer, turn it on, set the temperature and let the unit heat up
- Now for the fun part
- Insert a Glass Elbow (2) on both ends of the Tube (3).
- Now connect the Bubbler by inserting one Glass Elbow (2) into the Bowl (1), and the other Glass Elbow (2) into the Ground Joint of the Bubbler(4).
- Draw cool and tasty vapor through the bubbler
NOTE: You can use original elbows and a PVC hose for the same set up.
Arizer Hints and Tips Blog Articles:
Get The Most From Your Aroma Tubes – The perfect vapor starts with the perfect pack.
Get The Most From Your Cyclone & Connoisseur Bowls – Desktop bowls explained.
Temperature Recommendations – Dial in the connoisseur in you.
Battery Swapping – Never miss a beat with interchangeable rechargeable batteries.
Bubbler Basics – Feel the ripple effect with hard hitting bubbler action.
Cleaning & Maintenance – Easy to clean glass in just a few steps.